Slate Training Job Aid
Slate Technolutions ('Slate') has been adopted by UB offices to handle student recruitment, application generation and processing needs.
Note that this is a working document. If you see something that is no longer accurate, or if you would like to add something, please reach out to Brittany Sandor to make updates.
Jump to:
Processing Tasks
Academic Department/Program
In Slate, department/program Application Coordinators (AC’s) remain the first point of contact for their program’s applicants. Slate will send automatic emails to applicants throughout the application process reminding them to submit their application, pay their application fee, and submit their supporting documents, and applicants will use the online portal to check their admission status. Therefore, AC’s should not need to spend much time facilitating completed status.
Rather, their focus will be on confirming that application information and supporting documents received are correct, valid, and legible, that applicants meet minimum university requirements for graduate admission, and that applications move efficiently through the committee review process to the point of decision.
Office of Biomedical Education (OBE)
The Office of Biomedical Education plays a central administrative role for Jacobs School applications in Slate. OBE overarching responsibilities are below:
- business processes for application processing
- user accounts and permissions
- training
- troubleshooting
- conduit to Graduate Enrollment Services on behalf of departments
Certain functions will be more centralized in Slate. OBE will be responsible for the following processing functions:
- decision release
- applying fee waivers on student records, once approved by GES
- consolidating duplicate records
- running check queries to ensure data is correct and processes are functioning as needed
Graduate Enrollment Services (GES)
GES maintains the UB graduate instance of Slate, providing technical support and guidance/training to the Slate leads in academic units. They manage tickets for processing issues and petitions for exceptional cases (e.g. application fee waivers, GRE, or GPA below 3.0 waivers). They will confirm that newly enrolled students have documented their final bachelor’s degree, using application information in Slate.
International Admissions (IA)
The Office of Biomedical Education plays a central administrative role for Jacobs School applications in Slate. OBE overarching responsibilities are below:
- business processes for application processing
- user accounts and permissions
- training
- troubleshooting
- conduit to Graduate Enrollment Services on behalf of departments
Certain functions will be more centralized in Slate. OBE will be responsible for the following processing functions:
- decision release
- applying fee waivers on student records, once approved by GES
- consolidating duplicate records
- running check queries to ensure data is correct and processes are functioning as needed
International Admissions serves as “final approver” role for international applicants accepted by their programs. Using rules, IA will identify international apps that are ready for their review and, if all documents are in order, will assign the final Admit decision that will move the record into HUB. They then prepare the Certificate of Visa Eligibility so the student can apply for the required F-1 student visa to enter the U.S. (if required). IA will review petitions submitted in Slate for English proficiency waivers and conditional admission. They communicate directly with confirmed admits regarding any documents needed to finalize the initial offer of admission.
Person Record
The Person Record is where an individual's data will be stored and displayed. This includes their status, biographical and contact information, a timeline of interactions, application materials, academic, scores, interests, and much more. Navigate to the Records tab (first icon, looks like a Rolodex) to access.
Within a Person Record, there are several tabs:
Dashboard Tab
High-level summary where the student record is displayed.
Timeline Tab
Displays interactions, audit logs and messages associated with the student record.
Interactions
Slate will allow us to track important interactions with students that wouldn’t otherwise be logged or publicly accessed. Since OBE is more centrally involved in the admissions process, these will be important to keep us all on the same page.
- Go to Student’s Person Record
- Go to “Timeline” tab
- Select “Interactions” in right-hand bar
- Click “New Interaction”
Profile Tab
Standard fields associated with the student record, specifically bio demographic information, schools, and test scores.
Materials Tab
Where materials can be uploaded, such as transcripts, and associated with the student record.
Application Tab
Created once a student begins an application. The name of the program the student has applied to will be the title here. If a student has multiple applications within the medical school, they will have a tab for each application. Check the tab title carefully to make sure you are working in your program’s application.
Slate Application Statuses
Awaiting Submission
When students begin an application but have not submitted it yet:
- Students can upload transcripts, CV, and personal statement before they submit their application, and they are also able to send recommendation requests to their recommenders before they submit their application
- Students and recommenders get an email confirmation when a recommendation has been received
- Students will receive weekly reminders until they submit their application
Awaiting Payment
When students submit their application but have not paid/waived the fee yet:
- The link to pay the app fee is visible in their student portal after they submit the application
- The link will only show for students who have not paid. Once they pay the fee (or it is waived), it will disappear from their portal
- See Fee Waiver section for details
Awaiting Materials
When an application and payment have been submitted, but checklist items are missing:
- Each student will have a checklist in their portal where they can view what is missing and upload required documents
- It may take a couple hours for the checklist to update after they upload an item
- A weekly automated email is being sent to all students who have an incomplete application instructing them to log back in to see what is still missing, and to complete before the deadline
Awaiting Decision
Once all checklist items have been fulfilled (including the application fee paid), the application will automatically move to Awaiting Decision status and into the Confirm Materials bin.
- Application Coordinators must confirm that applications are complete and ready for review using the Reader Review Form. See Confirming Application Completion section for details
- Once marked as complete, students will receive a notification letting them know their application is complete and under review
Queries
Unlike in GrAdMIT, staff will not have a view by degree program that allows you to see an applicant list. To provide this information, OBE creates standard queries for use by department/program staff. Go to the Queries/Reports icon (next to the Person Record icon) to access these queries. If specific programs need additional queries, please contact OBE.
Slate Reader
Navigating the Reader Interface
The Slate Reader is designed to be navigated using both the mouse and keyboard. Mouse:
- Change sections: Click tabs in the left panel
- Zoom in: Double-click
- Zoom out: Right-click
- Move within/between pages: Click and drag
Keyboard Shortcuts:
- Move up/down/left/right: Arrow keys
- Page up/down: Pg Up/Pg Dn
- Zoom: +/-
- Next section: Tab
- Previous section: Shift + Tab
- Display 1st tab, 2nd tab, etc. in Index: 1-9
- Rotate page (PC): Ctrl + Left/Right Arrow
- Rotate page (Mac): Command + Left/Right Arrow
- Highlighter: H
- Highlight Remover: Shift + H
- Note Editor: N
- Queue display: Q
- Review Form: R
- Search: S
- Return to Dashboard display: Esc
Queue
Where a reader can view applications that are assigned to their queue.
How Students Apply
Students will apply entirely online via the link below. All communications with students should reflect our “paperless” process. They will create an account and select the application associated with their program. They will have the ability to save it for future editing and submission. Prior to submission, they can request letters of recommendations and upload transcripts. After they have submitted their application, they will be directed to the Applicant Portal. The portal will include the application fee link and any remaining Checklist items. Note that the Applicant Portal can take up to 40 minutes to reflect all Checklist requirements upon submission, so the student won’t see everything right away. This is noted in their portal.
Bin Movement
Applications will move through bins in the Pre-Review column in the Slate Reader automatically based on Slate Application Statuses. You can use queries to keep track of incomplete applications.
Checklist
On the Person Record’s Application tab, you can view the applicant’s checklist and see the status of these items.
Slate will automatically remind students and recommenders of what items are needed to complete their application.
Fee Waiver
UB will consider a domestic student’s request for an application fee waiver based on the following scenarios:
- Applying with veteran/military status
- Current or recent AmeriCorps participant
- EOP, HEOP, or SEEK program
- Exchange Program
- McNair Scholars or other TRIO program
- Sponsored Applicant
- Received a GRE fee waiver
- Master’s to PhD in the same program area
- Special approved program
- Claim of financial hardship
Some students will self-identify on the application, since one of the questions ask about special program participation. Others will contact you directly requesting a waiver.
To process an application fee waiver:
- Ask the student to email you the supporting documentation
- When you make the request for supporting documentation, note it in Interactions
- Upload in Materials when you receive it (Person Record > Materials tab)
- Select the material as “application fee waiver documents”
- Select the “choose file” button to upload the document you received from the student
- Once you’ve uploaded the document in Materials, submit the petition using the GES ticket system:
- Go to the student’s application tab in Slate, then “Click here to submit an application fee waiver for this applicant.”
- Submit the form
- When GES sends approval email, forward to OBE and we’ll apply the waiver in Slate
Recommendations
Students can resend the request link themselves via their application status portal. We are also able to resend the requests via the application tab on their person record.
If a student wants to change a recommender or edit their email address:
- Student will login to portal
- “Add” a new Recommender
- “Exclude” the recommender they want to delete
To send a reminder email OR the direct link:
- Go to Student’s Person Record
- Go to “Application” tab
- Click on the recommendation in their checklist.
- Click on “send reminder via Slate” to send the automated email again.
If recommender wants to change something but it has already been submitted:
- Click on their recommendation on the application tab in the person record
- Click on “reset” to un-submit their recommendation
- They should be able to use the same link to submit it again with the correct information
- Log the interaction in their timeline.
To manually upload a letter of recommendation on behalf of recommender:
- Go to Person Record > Materials Tab
- Click “New Material”
- Record = Reference you are adding (make sure you are adding this to the right application if there are multiple
- Material = Reference
- Upload File
English Language Scores
English Proficiency Test Scores
AC’s will run regular queries to identify and add these scores since the student’s checklist will remain incomplete until they are entered.
English proficiency waiver
To request a waiver, complete the English Proficiency Worksheet on the student’s Person Record > Application tab.
Confirm Materials Bin
When an applicant has submitted their application, you will receive an email notification that the application has been added to your queue. From the queue, you can open the application. Arrow through document using Mouse or Keyboard Shortcuts.
Annotations: You can make notes on the application using Annotations. As the Law School has advised, if you don’t want it read in a deposition, don’t write it! The student will not see this, but these become part of the student’s record.
Steps in Confirm Materials
Verify Application Documents using both Reader and Person Record (see below)
Verification of Application Documents
When verifying applicant documents, you will want to have 2 windows open: one for Reader, and one for the Person Record.
Verify the following checklist items:
- Resume/CV & Personal Statement
- Transcripts
- Test Scores
- Recommendations
- English Scores
Resume/CV and Personal Statement
- Verify documents are legible
- Verify documents are for correct student
Transcripts
Reader:
- Verify documents are legible
- Verify documents are for correct student
- Verify that all schools have been accurately reported (all schools are listed, dates of attendance, GPA, etc.)
- Compare transcripts and schools to Person Record and make corrections as needed:
Person Record:
If the schools/ transcripts are all present, but information needs to be corrected or added (such as a GPA, degree date, or CEEB code):
- Go to Profile tab
- On the right-hand side menu, click on “schools”
- Click on the school whose information you want to check or edit
- If the School Code field is blank for this school, that means its status may need verification. Notify Beth White and hold on further processing.
- Edit/update any fields that need changing, (double check that all fields you have information for are complete- including CEEB code) then hit “save” at the bottom
- Log the interaction in their timeline.
If a school was not reported and needs to be added:
- Check the Application Reader tab to see if they earned college credits in high school
- If credits were not from high school, go to the student’s Person Record > Profile tab
- On the right-hand side menu, click on “schools”
- Click on “new school”
- Enter the institution name and select it from the drop down, auto-fill menu
- Hit “save”
- On the initial review form, send the application back to the “awaiting materials” bin
- A new checklist item will automatically generate with the new school transcript
- Email the student to let them know that they must upload the new transcript in their portal.
- Log the interaction in their timeline.
Uploading a transcript (official or unofficial):
- Scan a copy or save the emailed scan.
- Go to Student’s Person Record > Materials tab
- Click “new material”
- Under Record, select the School
- For Material, select “transcript (official)” if it’s an official transcript mailed or emailed by the Registrar (if mailed, unopened by the student). If it’s unofficial, select “transcript (copy)”
- Use the Choose File button to upload the transcript > Click Upload
- If the transcript is the Final Official Transcript that shows proof of bachelor’s degree, then you will need to add a separate material for that (even if you just uploaded it as official), so GES will know it is received:
- Click “New Material”
- The Record should be “Folio” (not the school name)
- For Material, select “Final Bachelor’s Transcript”
- Upload the file using the Choose File button, hit “upload” at bottom
Degree Verification
To be eligible to enter a UB graduate program, an applicant must have earned a bachelor’s degree from a recognized institution. OBE will be running regular queries to catch issues, but program staff should also be aware of university policies.
If a domestic or international school has a School Code in Slate (on the Profile tab under Schools), it is a recognized institution. Please notify Beth White if the School Code field is blank.
For U.S. degrees, a degree must be earned at an accredited college or university. If you have the back of a student’s transcript, it will usually provide information on the school’s accreditation status. You can also find it on the school’s website. There are two other websites you can use to verify a school’s accreditation status:
For international schools, if the school is in the Slate database of institutions, it’s recognized by UB. You can confirm this by going to the student’s record, Profile tab – Schools and clicking on the school name to open its information. If School Code is populated, that means the student selected the school from the list of approved institutions. If School Code is blank, please contact OBE for further guidance as we may need to verify the school’s status with International Admissions.
Remember that not all bachelor’s degrees earned at foreign institutions are deemed equivalent to a U.S. bachelor’s degree. Three-year degrees are generally equivalent, but there are exceptions, notably from India. Check International Admissions’ IGARC site for country-specific information.
Test Scores (GRE/MCAT)
Reader:
- Make sure test scores are listed in this section and are correct.
- If official scores have been received from ETS, “verified” scores will be here.
- If you only have an unofficial GRE/MCAT score submitted by the student, it will not be listed here so must be added:
Person Record:
- Profile > New Score and add it as a Self-Reported score, if the report looks bona fide.
- If admitted, student will have a checklist item added for Official Test Score Report.
Recommendations
Reader:
- Verify documents are legible
- Verify documents are for correct student
- Verify recommender’s email address appears bona fide (i.e., it is not the email address of the applicant)
Person Record:
- If a recommendation needs to be edited, view directions above.
English Scores
Reader:
- Verify documents are legible
- Verify documents are for correct student
Person Record:
- If a scores needs to be added, or student will need a waiver, view directions above.
Application is Complete
Reader Review Form
When ready to verify application:
- In bottom right, click on Review Form/Send to Bin to open reader form. Don’t say “yes” on form until you have verified everything is complete.
- Review all documents in the PDF to verify the following:
- Applicant has submitted ALL transcripts and other required documents.
- All documents are legible and for that student.
- Student has or will have a recognized bachelor's degree.
- If student is international and a non-native speaker, English proficiency minimum has been met or you have been approved for a waiver.
- Schools and Scores have been verified in the applicant's Profile tab.
- Fill out Confirm Materials form in Reader.
- Clicking “yes” to the “is the application complete” question will email the student to notify them their application is considered complete.
- If your committee requests it, you can use International GPA Equivalency field to enter a US equivalent GPA that you’ve calculated.
- Select First Committee Review bin on the reader form.
- Send.
Assign to Committee
The Application Coordinator must manually assign the application to committee members’ queues:
- Go to student’s Application Tab
- In the right-hand column, click on Workflows > Edit. You will see the file is already in the First Committee Review bin – don’t change anything there.
- Add Reader: Type the name of each committee member, plus your own, and select from the auto-populated list.
- Save.
- Email your committee members to notify them that the file is in their queue.
Application is Not Complete
If you determine application is not complete after this first review:
- Move their application to the “awaiting materials” bin via the Reader Review Form.
- Determine if the material needs to be replaced with a new material or if you are missing a material
- Replace Material:
- Contact the student to let them know what is needed and that you will be deleting the original so they can upload the new one through their portal.
- Go to Student’s Person Record > “Materials” tab
- Click on the material > “delete” at the bottom
- There may be more than one with the same name so make sure it is for the correct application
- Once a material is deleted, it will automatically uncheck it from their checklist, and they should be able to upload a new item
- Log the interaction.
- Replace Material:
- Add Material:
- If a school was not reported and needs to be added, review Degree Verification section above.
- If you’re missing a Material that’s not currently on the student’s checklist, please contact OBE for instructions on adding a new checklist item.
First Committee
Once the AC has confirmed the applicant’s materials are complete, they will be assigned to the committee’s queues. AC’s will need to let faculty members know that applications are ready for review.
Review Form
- Access the Review Form on the bottom right corner.
- Each department can use as much or as little of the rating scale as they would like. Faculty reviewers should work with the DGS to determine what process will work for their review process.
- Faculty reviewers then Save and Send.
When a committee member reviews the application and submits the reader form, the file drops out of their queue. AC’s will track their committee’s progress in reviewing applications by noting who still has the file in their queue. You can track this is a couple of ways:
- Go to your Queue in Reader. You’ll see your name plus any other readers who still have the app in their queue.
- Go to Workflow on the Application tab. You’ll also see all assigned readers here.
It is the AC’s job to remind faculty if an application remains in their queue. Once AC sees that all readers have reviewed an application, they have two options:
- Send to Graduate Director Review bin (use case: graduate director uses Slate to gather committee member feedback and make decision)
- Queue > Select applicant
- Open Review form > select Graduate Director Review as the Next Bin and assign to graduate director’s queue.
- Send.
- Send to Admit, Deny, or Waitlist decision bins (use case: graduate director meets with committee to discuss applicants and make decisions as a group, then asks AC to add decisions)
- go to Workflows on application tab, click Edit; select the appropriate decision bin and save; see Decisioning below.
Graduate Director
Once the AC has confirmed that all committee members have reviewed, they will send to the Graduate Director Review bin.
- AC will need to notify DGS that the application is ready for review.
- In the Graduate Director Review bin, the DGS can review the previously filled out Review Forms by the committee at the end of the document (“Review Forms”)
- Next Bin: At this point, the DGS can either send it for further review or make an admissions decision:
- Second Committee Review (for when a decision is not clear-cut by the committee and DGS, requiring further review)
- Interview
- Admit, Deny, Waitlist
Adding New Faculty to Slate
You can request Slate access for new faculty via the form below. Please Note: Faculty members will not be added to Slate until AFTER their Faculty Appointment has been completed by the Jacobs School.
Admit
Note this section is for Domestic students. International Admissions information can be found in the next section.
Domestic Students with a Foreign Bachelor’s Degree
Domestic students who have obtained their bachelor's degree from a foreign institution, who have not also obtained a U.S. bachelor's degree, must have their foreign documentation reviewed and approved by International Admissions after an admit decision has been made by the program, but before the decision is released. You will find instructions for this process on the Domestic Students with a Foreign Bachelor’s Degree page.
- In Slate Reader, move student’s application from the Graduate Director or First Review bin to the Admit bin.
- Prepare the student’s Acceptance Letter and save PDF.
- Student’s Person Record > Application Tab (for your program)
- Scroll down to Decisions > New Decision
- Code:
- Domestic Students: Admit or Conditional Admit
- International Students: International Admit (all internationals)
- Reason:
- Assistantship: if awarding assistantship as part of offer
- Blank: if not awarding assistantship as part of offer
- Letter: MED Admit
- Tick ‘Confirmed’ Box (DO NOT tick ‘Released’)
- Custom Letter Upload: upload copy of student’s PDF letter
- Custom Letter Override = “show only custom letter”
- OBE will release the decision on the same or next business day. Once the decision is released, the student will receive a “status update” message
- After the decision is released and the student views their update, new checklist items are assigned:
- Jacobs Reply to Offer of Admission: this online form must be submitted by all students who accept our offer. If the student doesn’t submit the form, staff can do this for them.
- Final Bachelor’s Transcript: this informs them of the requirement for this final document. Note: the only official undergraduate transcript that’s required by UB is the one confirming the bachelor’s degree.
- Final Graduate Transcript: if they have graduate coursework
Deny
- In Slate Reader, move student’s application from the Graduate Director bin to the Deny bin.
- Student’s Person Record > Application Tab (for your program)
- Scroll down to Decisions > New Decision
- Code = Deny
- Reason = leave blank
- Letter: MED Deny
- For most programs, when you select this letter, you will see a preview of the standard deny letter template for your program, signed by your graduate director. This is what the student will see when they log in to their portal. Notification is online only (no paper letter sent).
- If your program did not request a standard letter template, or if this is a special case where you want to send a custom letter, you could upload a PDF of a denial letter in Custom Letter Upload. In Custom Letter Override, select “Show only custom letter.”
- Tick ‘Confirmed’ Box (DO NOT tick ‘Released’)
- OBE will release the decision on the same or next business day. Once the decision is released, the student will receive a “status update” message
Waitlist
Like the Deny option above, OBE can create a standard letter template for your program, signed by your graduate director, for the waitlist decision. If you will use this option, please contact Beth to request the customized template.
Withdrawals
There are several withdrawal scenarios:
Student who is admitted replies “no” on the Reply to Offer of Admission form.
- During the cycle, OBE will run queries to assign the Applicant Withdrawal, Declined Offer decision, which transfers the withdrawal to HUB.
Student with an application in progress (pre-decision) notifies you that they’re withdrawing.
- Add a new decision on the application tab using the code Applicant Withdrawal.
- Reason code = Incomplete App – Withdrew.
- Letter remains Default for Decision. Student receives no notification.
- Tick “Confirmed” (NOT Released) and Save.
Application coordinator withdraws application for administrative reasons.
- Add a new decision on the application tab using the code Administrative Withdrawal.
- Reason code: choose from list of options, which include “incomplete application,” “application fee not paid,” etc.
- Letter remains Default for Decision. Student receives no notification.
- Tick “Confirmed” (NOT Released) and Save.
Quick Guide
Pre-Decision
- Ensure that the student’s degree is recognized. Visit IGARC for policy details.
- Ensure that the student meets UB’s English proficiency requirement. See current policy on IGARC and/or Graduate School’s sites.
At Point of Decision
- If offering admission, move to the Admit bin as usual. However, note that the acceptance decision code MUST be International Admit. Do not use the Admit or Conditional Admit codes for an international applicant. This code keeps the application in “pending” admission status while International Admissions completes its review.
Post-Acceptance
- Once an international student’s acceptance has been released and the student accepts our offer on the intent to enroll form, a rule will move it into the Send to INT Admissions bin. It will stay there until the applicant has submitted all required immigration and financial checklist items AND you have completed the Required Information for International Applicants form. After this point, OBE will monitor the application through IA’s processing workflow.
Awaiting Decision
Apps are in Awaiting Submission, Awaiting Payment or Awaiting Materials bins.
Visa Verification
Be aware that OBE is checking for this on behalf of all programs. If there are any inconsistencies in the citizenship/immigration info provided by the student on the application, a Visa Verification Form automatically shows up on their checklist, requesting more information. OBE will be checking the info provided on the form and moving apps out of international status as appropriate. If any questions about this, please contact Beth.
English Language
Test Scores: The English Proficiency checklist item cannot be satisfied until scores are entered on the Profile tab. If scores aren’t entered, the application will not move to Awaiting Decision status and the Confirm Materials bin.
- Run the Intl Test Scores query regularly for apps in your program(s).
- For any results, go to the student’s Materials tab to view the test score report. If it meets the minimum requirement and is in an acceptable format, go to the Profile tab and select Scores on the right.
- Click on New Score.
- Select the score type (e.g., TOEFL, IELTS) and enter the test date.
- Status = Self-Reported
- Enter the scores and Save.
If the score does not meet UB’s minimum requirement and was not entered, you can notify the student that the score is too low (though this step is not required)
- On the Profile tab, click on Biographical.
- Click on the student’s email hyperlink
- Send the notification email.
- When you do this, the email automatically shows up on the student’s timeline and in the Iist of Interactions.
English Proficiency Worksheet
Per the UB English Proficiency policy (see IGARC or the Graduate School websites for policy details), you will likely need to request fewer waivers than in the past. Exemptions based on citizenship should happen automatically via rules, but other exemptions may require you to take action on the student’s application (e.g. exemptions based on transferring from another U.S. college within three years or less, continuing UB students). In those cases you will need to take action so that the application doesn’t hang there as incomplete due to a missing English Proficiency checklist item. If you are requesting a true waiver (e.g. applicant has worked in the US for several years before applying), you must also take action to submit the request.
Use the English Proficiency Worksheet to request an exemption or waiver:
- Go to the Person Record, > Application tab
- Click on Record Management for International Students on right (this shows up by default on all international application tabs)
- Click on English Language Proficiency Worksheet for International Applicants
- Answer the questions as they pertain to the student’s application. If an automatic exemption is appropriate, the rules will run when you hit Save to remove the English Proficiency checklist item. This may take time.
Confirm Materials Bin
Once all checklist items are satisfied, both domestic and international applications will move into your Confirm Materials bin for confirmation of completion.
Follow steps above, with special consideration for:
- Ensure that student’s degree is recognized. Visit IGARC for policy details.
- Ensure that student meets UB’s English proficiency requirement. See current policy on IGARC and/or Graduate School’s sites.
If one, or both, of these have not been met, move back to Awaiting Materials.
Financial documents are not required for academic review, so are not needed at this stage of the application process. International students will see these items (financial form, bank statement, passport bio page, etc.) on their checklist as soon as they submit their application, even though they’re not required until/if the student gets to the point of IA review. (Note that the Financial Form checklist item links to the forms on the Graduate School website. Our students should use the Standard Graduate Version.)
Decisioning - Admitting an International Student
If offering admission, note that the acceptance decision code MUST be International Admit. Do not use the Admit or Conditional Admit codes for an international applicant. This code keeps the application in “pending” admission status while International Admissions completes its review.
AC will move the application to the Admit bin as you would any other admitted student. If the student completes the Reply to Offer of Admission form to say they will enroll, a rule will move the application into the Send to INT Admissions bin. It will sit there until all conditions are met for IA review.
Submitting for IA Review
When an int’l applicant accepts their offer on the reply form, a rule moves the application to the Send to INT Admissions bin. It waits there until all financial docs are received and the AC submits the Required Information form. IA will use rules to pick up the applications in the Send to INT Admissions bin that are ready for their review. Your job is to ensure that all the needed documents and information are provided so they will pick up the application in their rules.
The following checklist items must be satisfied:
- Department Accept Letter. NOTE: Even if you uploaded the accept letter when you accepted the student, you must now upload a copy in Materials. Click New Material and change the default from Folio to your specific application (e.g., Physiology MA Fall 2020). Under Material, select MED_Admit Letter. Upload a scanned copy and save
- Transcript
- English Proficiency
- Passport
- UB Financial Form (if I-20 for F1 visa required)
- Bank Statement(s) and/or Department Funding Letter (if I-20 for F1 visa required)
Once satisfied, submit the Required Information for International Applicants Form (below).
After the Application Coordinator completes these steps, they will receive an email if IA puts the application On Hold. Once the hold is resolved, notify IA in Slate so they can complete processing.
On Holds
When an IA counselor has determined that an application must go back to the department On Hold for further information or documentation, the designated department/school staff member will receive an email indicating who the applicant is and the reason for the On Hold decision as described by the IA counselor.
Department staff will then work to resolve the On Hold issue.
Once fully resolved, department staff will access the On Hold Resolution for International Applicants form so that the record can be reviewed again by the IA counselor who put it On Hold.
To access the On Hold Resolution for International Applicants form:
Go to the applicant record in Slate.
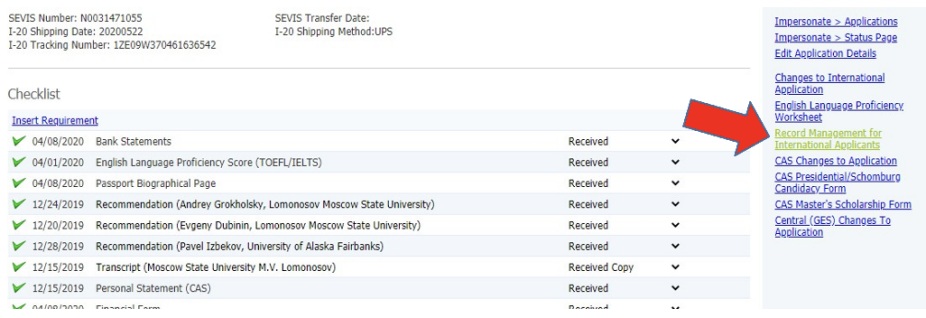
1. From the program tab, navigate to “Record Management for International Applicants” and click to open the menu of all IA forms needed to manage your international applications:

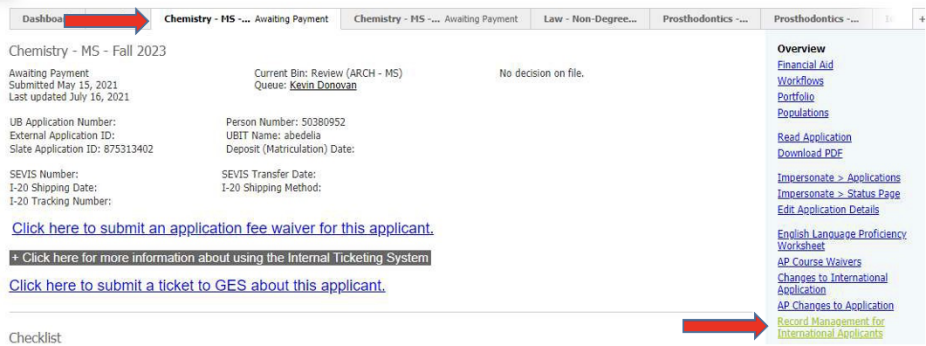
2. From the menu, click on “On Hold Resolution for International Applicants”.
3. This opens the form to be completed and submitted:


4. Select the “Resolution Status” from the drop down menu.
5. In Resolution Reason, use the text box to type in what you did to resolve the on hold issue and any other pertinent information that the IA counselor might need in order to continue review of the app.

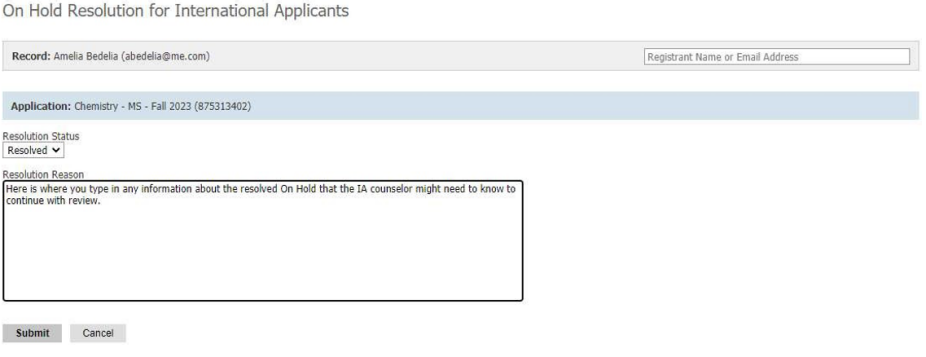
6. Click Submit.
7. Form submission moves the app back to the last INT review bin by rule.
8. Form submission emails the IA counselor who put it On Hold to alert them that this app is ready to be reviewed again.
A note on Retroactive Refresh
This is an essential step in the processing of international applications, particularly when the applicant’s record has intersected with International Admissions in a previous term. New this year, all AC’s can process retroactive refresh themselves.
- On the student’s application tab, copy the Slate Application ID.
- In Queries, go to your Retroactive Refresh query.
- Click on Edit Query at right.
- Under Filters, double-click the Application Slate ID filter to open it. Paste in the application ID you copied in step 1.
- Save. At the top of the screen, click on the breadcrumb that takes you back to the query. Click Run Query button.
- Under Output, select Retroactive Refresh (under Batch Management).
- Click Export.
- A dialogue box pops up asking if you’d like to refresh the record. Click Submit.
Required Information for International Applicants Form
This form allows you to check, correct, populate, and/or update the required international fields all in one place. This form can be submitted multiple times over the course of the app life cycle if and as necessary; the latest data will overwrite any previously submitted data.
We recommend that this form be reviewed and submitted for the first time towards the end stages of your admission decision processing on an international app, prior to the “International Admit” decision being entered on the record. This way the latest, most “correct” data will be entered in the record for our review. Reviewing and submitting this form helps you to know that you’ve provided the required international fields for bin movement.
Please note this is not a communication tool, therefore if you’ve changed something on this form after all INT processing has taken place, we will not be made aware of the changes. You will need to contact IA regarding the changes you made, and why, so that we can determine the next steps that might need to take place to get the app back into the processing workflow, if necessary.
To access and submit the form:
1. Click on “Records Management for International Applicants” link
2. Click on “Required Information for International Applicants” form
3. Work through all of the questions. Any fields that you have already populated, or that were auto- populated by the application, will be indicated. Conditional logic will roll out appropriate questions and options based on your responses.
- Be sure pre-populated fields are still correct.
- Complete relevant questions that are currently blank.
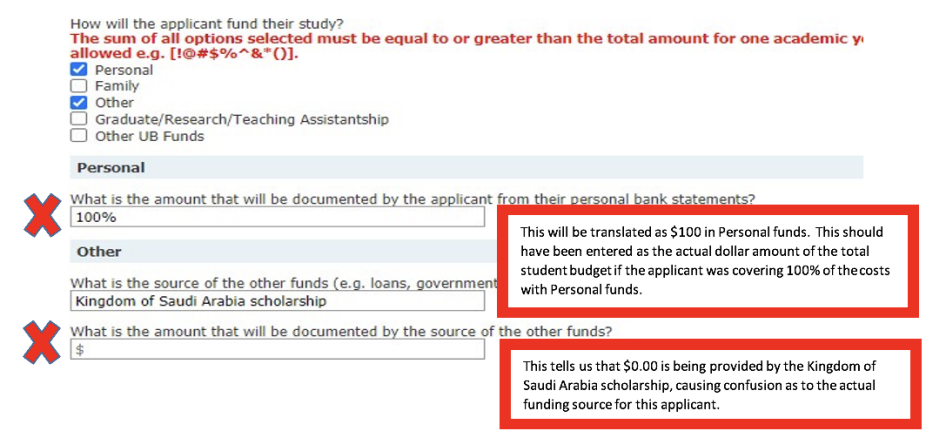
4. Note that in the funding fields, percentage answers are not allowed. Those text fields require dollar amounts. Please be sure these are correctly populated as you work through the form.

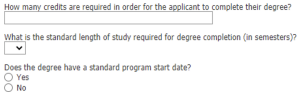
5. In order to issue an I-20 with the correct start and end dates for each applicant, you are required to provide information about the program length of study, and special start date if applicable:

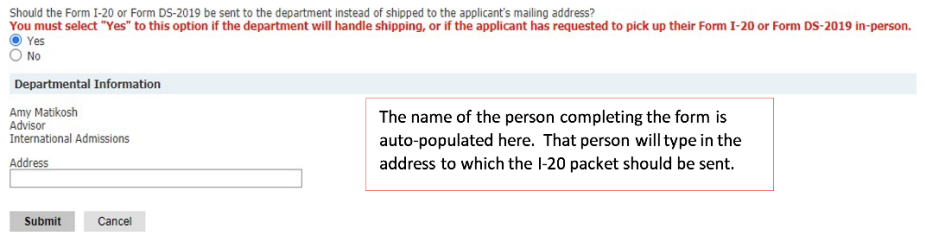
6. Complete the shipping data. If you opt to have the I-20 shipped to your department, they will be sent care of the person completing the form, to the address typed in on the form:

7. Once you’ve verified and/or completed the form, click Submit. You will receive an email acknowledging the submission.
If you changed any visa or immigration fields, you will need to run a Retroactive Refresh on the record, AFTER the rules have executed, to make sure the appropriate checklists are present.
Wait for the rules execution notice to clear and then go ahead and perform the Retroactive Refresh function.


Deferring International Applications
When deferring (cloning) an international application, be sure to run the Post-Clone Update on the new application after you have updated it with the new program or term. You will receive an automated reminder to run a retroactive refresh after submitting Post-Clone Update.
1. Clone the application record (using instructions from GES)
2. Go to newly cloned application tab for new semester.
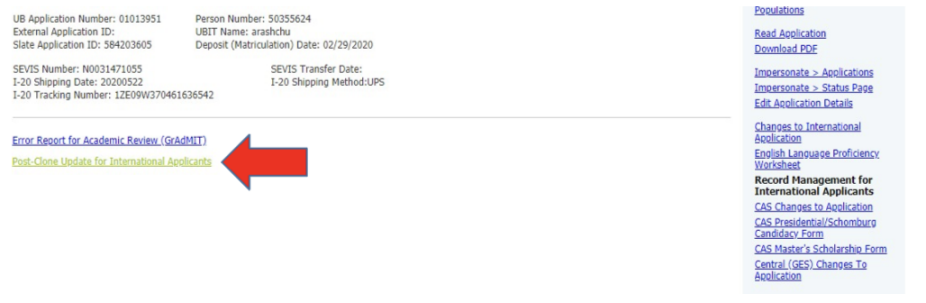
3. Click on “Record Management for International Applicants” link

4. Click on “Post-Clone Update for International Applicants” to automatically clear out the pertinent fields

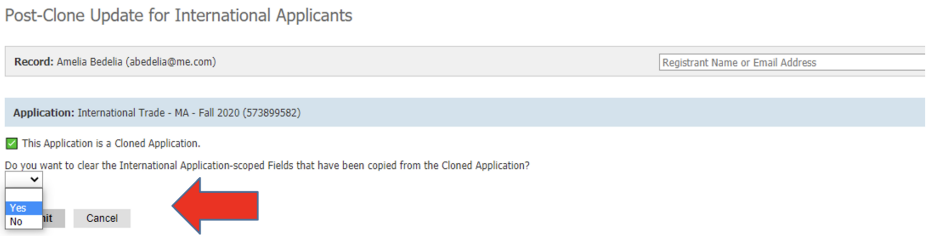
NOTE: If you haven’t completed the Cloning process on the app, you will get an error message when you click on “Post-Clone Update for International Apps” alerting you that the action is not available for this record. If you get this error, go back and work through the cloning process using the instructions from GES.
5. Affirm that you want to clear the International Application-scoped Fields that have been copied from the cloned application. Click Submit.

6. Go to the Materials tab and make sure that the relevant materials are associated to the new app term. This should happen when you go through the cloning process using instructions from GES, but please take a moment to make sure. If the Materials are not associated to the new term, they won’t be visible in the Reader, and they won’t be picked up as present/existing for any rules or other queries that use them as filters.
7. Proceed with your departmental review. Make sure to check through and complete the Required Information for International Applicants form as part of your review
8. Click on New Decision to add your new decision for the new app term and select “International Admit” as your decision (as usual). Make sure your admit letter has been updated for the new admit term!
Non-Degree Students
Non-degree applications are open as a standard in both the fall and spring terms. Some students mistakenly apply for non-degree study when they don’t find the degree program, they seek on the graduate application site. Slate sends an automatic email to any submitted non-degree applicant clarifying what they applied for. Note that, in most cases, international students are not eligible for non-degree study. Contact International Admissions with questions about possible exceptions.
Awaiting Submission
- Student will submit application and pay the $35 application fee.
- Only one checklist item: bachelor’s degree transcript.
- Once checklist is complete, rules move the app into Confirm Materials and appropriate AC’s queue.
Awaiting Decision
- AC completes reader form in Confirm Materials as usual. Move to Non-Degree bin on the reader form. Could assign DGS as reader here, as well, if needed.
- DGS or AC reviews in Non-Degree and moves to appropriate decision bin.
- AC confirms the appropriate decision. Decision notification will be in portal only.
Post-Acceptance
- If accepted, student does not need to complete the intent to enroll form. Accepted non-degree records will move to HUB automatically to create person number needed for registration.
- The online portal provides information to accepted ND students with next steps.
Spring and Direct Admit Applications
Applications for degree programs that do not normally accept students (only on an ad hoc basis) will not display in the Slate list of active applications because we don’t want them open to the public.
Unlike in Gradmit, staff can’t easily turn applications on and off as needed. Therefore, use this “ad hoc” process.
Applicant Steps
- Advise applicant to go to the Slate application website
- Instruct them to complete an application for the term in which they wish to apply. They will not see their degree program as an option.
- They should complete app and Save For Later (not Submit). It will warn them to add a degree program, but they can ignore this. Students should complete all remaining parts of the application, including uploading transcripts and submitting information for all 3 recommenders.
- Ask them to notify you once they have saved the application.
Application Coordinator Steps
- Go to student’s Record to ensure that their application is complete, including Recommenders and Academic History/Transcripts
- Select Application tab that does not include a degree program. It will list the app round at the top, e.g., 2020 Jacobs School, but no degree program.
- Click on MED_Changes to Application link at the right under Overview. Note: This option may not appear for up to 40 minutes after the student saves the application; allow time for rules to run.
- Click on Edit and select the correct degree program.
- Save.
- Next, submit the application on behalf of the student: Click on Edit Application Details on the application tab. Check the “Submitted” box and Save.
- Inform the student that you’ve submitted the application. Instruct them to login to the portal to upload any remaining documents, if needed. Note: Checklist items may take up to 40 minutes after the you submit their application to appear; allow time for rules to run.
Clone (Copy) an Application
Slate allows staff to clone an application for a new term or program. You will clone an application when the student applied for a given degree program or term, but the department/program decides to consider them for a different program or term.
When you would clone
- The application is denied, and students wants to be reconsidered for new term/program
- The applicant withdraws and wants to be considered for the same program in a new term
- The applicant applies for one degree program in the department but decides to switch to a different program within the same department, either in the same term or a new term.
- The applicant is deferring their admission to a new term
Note: You must clone an application if key information on a decided app needs to be corrected. Do not make changes to term or degree program on a decided app without cloning. Check with OBE for assistance.
Steps
- Go to student’s Application tab. The application must have a decision. If there isn’t one, add a Withdrawal decision using the code Administrative Withdrawal.
- Click on Edit Application Details on right-hand side menu.
- Click Clone and a new Clone Application box comes up.
- Leave the Round as Jacobs School of Medicine and Biomedical Science unless the original application round has closed, in which case the default round will be Archive Jacobs School of Medicine and Biomedical Sciences. For checklist assignment and other rules to run properly, the new cloned application must be updated in Edit Application Details to the active round, Jacobs School of Medicine and Biomedical Sciences.
- Leave the “options” boxes checked, but be aware: Copy Materials – If the applicant is moving to a future term, you may require new transcripts or letters of recommendation, depending on your program’s policies. You would want to leave this checked to bring all materials over. But there may be materials you would selectively delete after cloning on the new app so they would appear on the checklist as required.
- Click Clone. Rules will run to establish the new application.
- Wait to proceed until you see the MED_Changes to Application tab on the new application. Once it’s there, click it. Be very sure at this point that you are working in the NEW application! Do not make changes to the initial application.
- Select the term and application degree program for the new application.
- If an international applicant, next run Post-Clone Update on the new application (found on Record Management for International Applicants). You will receive an automated reminder to run a retroactive refresh after submitting Post-Clone Update.
- Save and continue processing application.
Sponsored Applications
The U.S. State Department has several programs that they support and work with to place international students in U.S. universities. Please note that an agency-placed sponsored student is a very specific type of student; that is, once who is being placed at UB through a recognized external U.S. government organization. Students who may receive funding from their own government or university are not agency-placed sponsored students and should be processed according to UB’s standard admissions procedures. The instructions below are specific to applicants sponsored by a U.S. government agency that is placing them at UB.
Examples of sponsoring agencies are IIE, LASPAU, and AMIDEAST, which encompass programs like Fulbright, the Tibet Fund, and others. These agencies typically submit applications to multiple institutions on behalf of a student and then, if accepted, the agency will select the school at which the student will be placed.
Processing a Sponsored Applicant
- Funding agency forwards app materials to UB International Student Services (ISS), which forwards the materials to Beth White. On the application tab under Workflows, then Populations, Beth adds Agency Placed Sponsored Applicant tag.
- Beth forwards materials to the appropriate application coordinator. In most cases, the agency will already have submitted a Slate application and materials on behalf of the student. Typically, the app will already have all required materials in Slate, but if not they will be included in the PDF dossier forwarded by the agency. This dossier should be saved as a new Material.
- Sometimes, an application may come in without going through ISS first. These are easy to spot because the mailing address is the agency’s, usually in Washington, DC or NYC, and all the documents will have the agency’s stamp. If you see an applicant like this that didn’t come through ISS, please let Beth know.
- The program reviews the application as usual for admission and, if possible, departmental funding. Note there should be no communication between the program/department and the student at this stage. The sponsored applicant tag has been added to the app to remove it from the usual communications regarding app status, etc.
- Once a decision is made, you can enter in Slate as usual. If the student is accepted, all parties wait for a placement decision from the sponsor.
- If the agency agrees to place the student at UB, the student may complete the reply form as usual, or Beth will be notified by ISS and she’ll inform the program.
- Typically, the sponsoring agency will provide the certificate of visa eligibility, so UB will not issue one. However, the program still needs to submit the application to International Admissions, using the Required Information form, so the final Admit offer can be released and the student record activated in HUB. Use the “No I-20 Required” option so IA knows this is an academic approval only.